Who works on what, week by week.From this code.
Filament has no resource planner. People and projects are your own Eloquent models; Warp Capacity only stores the bookings.
$panel->plugin( FilamentWarpCapacityPlugin::make() ->people(Employee::class, title: 'name', group: 'department') ->projects(Project::class, title: 'name', subtitle: 'client.name') ->currency('USD'),);- ✓People down the side, weeks across the top
- ✓Drag a booking to another week or another person
- ✓How much of each person's time is booked
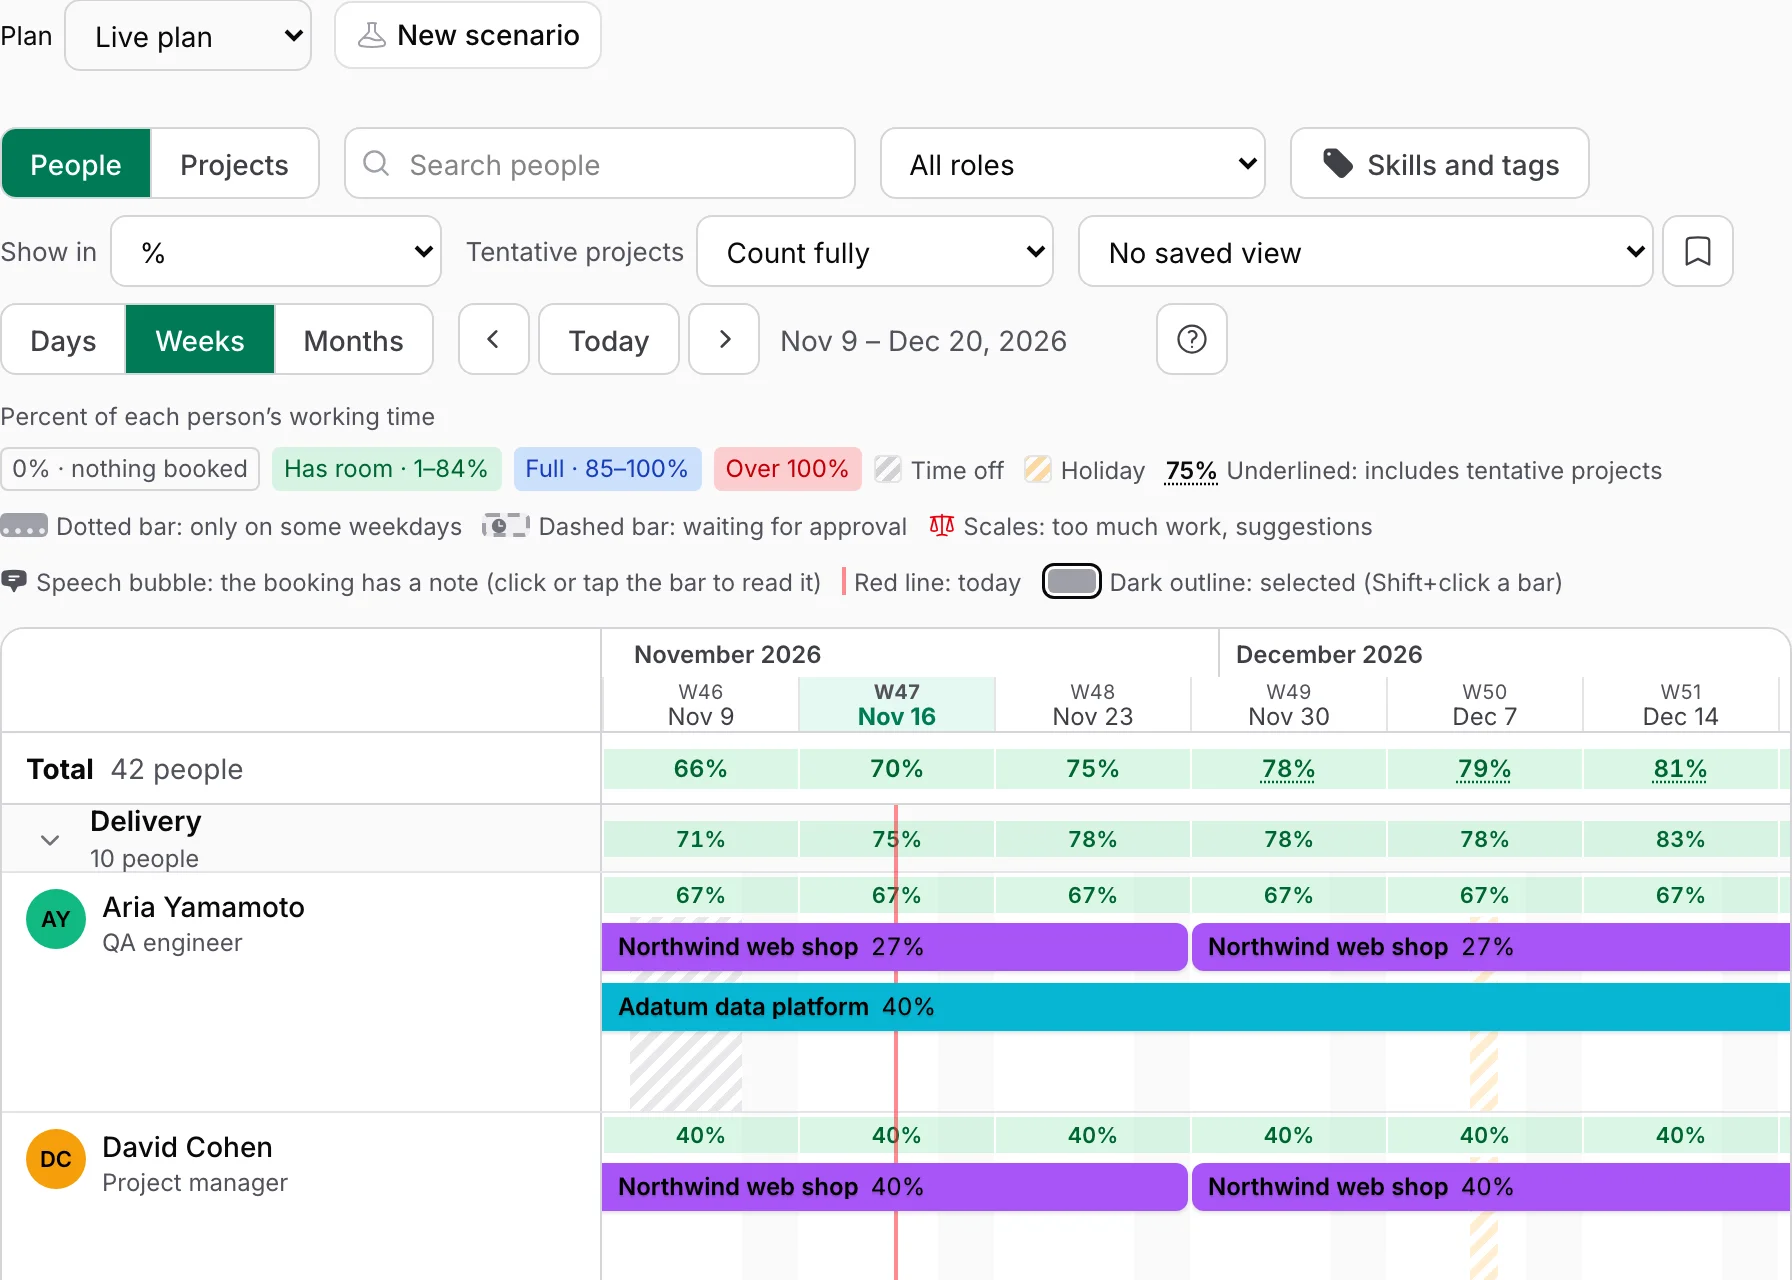
The picture is this demo's planner, which adds booking requests, calendar feeds and notifications.
Welcome to the Warp Capacity demo
An agency of 42 people in five teams, 14 projects (ten confirmed, three not won yet, one finished) and six weeks of timesheets. You are Samuel Lopez, a project manager. Each tip below is one thing to try; every page also lists its own tips in the green box “Try it on this page” at the top. Try them in any order — the data is reset every hour.
Planner: who works on what, week by week Open the planner →
-
1
How full each week is
The strip above each person has a box per week, coloured like the key above the grid: 0% · nothing booked, Has room · 1–84%, Full · 85–100% and Over 100%. In the Projects view, point at a project’s box: it says how many full-time people that is.
-
2
Time off and holidays in the grid
Hatched grey days on a row are that person’s time off. A hatched orange column across everyone is a public holiday. Both are taken out of working time.
-
3
Numbers that include work not won yet
An underlined percentage includes tentative projects. Point at it: the box that appears lists the hours of tentative projects.
-
4
Move a booking
Drag a bar to another week or onto another person. The percentages above that person change at once.
-
5
Make a booking longer or shorter
Drag the left or right end of a bar. The booking now starts or ends on the day you let go.
-
6
Copy a booking
Hold Alt (Option on a Mac) while you drag a bar: a copy is dropped where you let go, and the original stays.
-
7
Undo a change
After you move, stretch or copy a bar, press Ctrl+Z (⌘Z on a Mac): the bar goes back where it was.
-
8
Cut a booking in two
Click a bar that is a few weeks long, at the week where you want to cut it, and press Split in the form. The day you clicked is filled in; press Split again. The bar is now two bars, and the second one starts on that day, so you can drag or delete one part. Ctrl+Z (⌘Z on a Mac) joins the two parts again.
-
9
Move several bookings at once
Hold Shift and click two or three bars: each gets a dark outline, and a bar at the bottom of the screen counts them. Drag one of them: they all move by the same number of days. Delete selected deletes them all; Ctrl+Z (⌘Z) brings them back.
-
10
Show only people with a skill or tag
Press “Skills and tags” above the grid and tick Remote: only the people with that tag stay, and the Total row counts only them. Tick Contractor as well and only remote contractors are left. “Clear” brings everyone back.
-
11
Find who is free
Press “Find who is free” at the top, leave the two dates, type 40 under “Free hours needed” and press “Show them in the planner”. The planner now shows only the people with at least 40 free hours in those two weeks, with the free hours under each name, and a message lists the five with the most time. “Show everyone again” on the bar above the grid ends it.
-
12
Come back to the same view
Choose “Designers by month” under “Saved view”: the planner switches to months and to the designers in one step. To keep a view of your own, set the planner the way you like it and press the bookmark button, “Save this view”.
-
13
Book someone
Drag across an empty part of someone’s row. A form opens: choose a project and how much — % of their time, hours a day, hours a week or FTE.
-
14
Change the unit
Switch “Show in” from % to Hours, FTE or Person-months. Every number in the grid changes; a full-time month is 1.0 person-month. In the Projects view, a project row in % adds up its people: two people full time show 200%.
-
15
Book a role before you know who
Press Add placeholder (top right) and book a role without a person, such as “a designer, 50%”. It is listed under “Unfilled roles” at the bottom of the grid.
-
16
Fill a placeholder
Scroll to the bottom of the grid, to “Unfilled roles”. Press Find someone on a row: people with the role, the skills and the most free time come first; pick one and the booking is theirs.
-
17
Help someone who has too much
Lily Andersen is over 100% (red). Next to the name Lily Andersen is a red scales button; it is always there for anyone booked over their time, also on a phone. It suggests a colleague with time, a later start or fewer hours a day; pick one and it is done.
-
18
Try a plan without changing the real one
Press New scenario and move people onto Woodgrove online banking, a project not won yet. The live plan stays as it is until you apply the scenario, or you throw it away.
-
19
Bookings on some weekdays only
A bar ending in weekday names repeats only on those days: Lily Andersen’s “Tailspin booking portal 13% · Mon, Wed” is on Mondays and Wednesdays.
-
20
Phases and milestones
Switch the planner from People to Projects and scroll to Northwind web shop: coloured bands show its phases (Discovery, Design, Build, Launch) and a diamond marks Go-live. Each booking belongs to one phase, which is why Northwind’s bars are split where a phase ends.
Projects in the planner → -
21
Shift a whole project
Switch the planner from People to Projects and scroll to Northwind web shop. Press the two-arrows button on its row, leave “Later”, 1 and “Weeks”, and press Shift: every bar and the phase bands above them move one week to the right, and a message counts what moved. Ctrl+Z (⌘Z) puts them all back.
Projects in the planner →
Demand and supply: enough people for the work? Open Demand and supply →
-
22
Find the shortages
The table “By role” shows work / working time for each role and week. Red cells with ▲ mean more work than people: backend developers run short in a couple of weeks.
-
23
Count projects you have not won yet
Change “Tentative projects” from Count fully to Weigh by chance: Woodgrove (60% chance) then counts for 60% of its hours, and the hatched part of the bars gets smaller.
-
24
Whom to hire, and when
The hiring forecast at the bottom lists roles that stay short four weeks in a row, how many people to hire and when to start looking (hiring takes 8 weeks in this demo).
Hiring forecast →
Projects: budgets and billing Open Projects →
-
25
Watch the budgets
“Spent so far” comes from the timesheets. “At the end” adds the rest of the plan. A red number means the project will end over its budget if the plan happens, like Fabrikam brand refresh.
-
26
A budget for each phase
Open the ⋮ menu at the start of the Northwind web shop row and choose Details: each phase has its own budget in hours. Build and Launch are planned for more hours than their budgets.
-
27
From hours to invoice lines
Press Billing at the top, choose a month and download: approved hours become one invoice line per project and person, ready for your invoicing tool.
-
28
A monthly fee with an hour range
Adatum data platform is billed $19,000 per person a month for 140–180 hours: open the ⋮ menu at the start of its row and choose Settings. In Billing, hours above or below that range are added or taken off.
-
29
Another currency
Litware intranet is billed in euros, so its revenue and budget are shown in €. Exchange rates at the top sets how many euros a dollar buys.
-
30
A monthly work report for the client
Open the ⋮ menu at the start of a project row and choose Work report: last month’s hours by person and day, laid out to print or save as a PDF.
-
31
Costs that are not hours
Open the ⋮ menu on Northwind web shop and choose “Expenses”: stock photos, a subcontractor and a workshop trip, each with its cost and what the client pays for it. Close it and choose “Details” in the same menu: “Expenses so far” and “Expenses at the end” are counted in the cost and the margin. Add a line of your own and the margin in the list changes when you save.
-
32
A project for an agreed price
Proseware analytics says “Fixed price” under its name: its revenue is the agreed 160,000, however many hours go in, so the margin shows what is really left. The switch is under “Settings” in the ⋮ menu.
-
33
Plan a new project from a template
Alpine Ski House app is only roughly planned so far. Open the ⋮ menu at the start of its row and choose “Plan with a template”. “Website build” is already chosen; the blue box says what will be added and when the plan ends. Press “Apply the template”, then open the planner in the Projects view: Alpine Ski House app now has phase bands and placeholder rows such as “Designer”, next to the bookings it already had. To take it all away again, choose “Remove what a template added” in the same menu.
-
34
Show a client their plan without a login
Open the ⋮ menu on Northwind web shop and choose “Share a read-only link”, then press “Create the link”. Copy the address and open it in a private window: the phases and who works on the project week by week, with a Print button — and no money, no rates and no other project. Back here, “Shared links” in the same menu shows that it was opened; press “Revoke” and the same address says “not found”.
My timesheet: your own hours Open My timesheet →
-
35
Fill in your week from the plan
The grey numbers are your planned hours. Press Fill in from the plan: they become real hours you can change, day by day.
-
36
Send your week for approval
Change a day, then press Submit for approval. The week can no longer be changed while it waits; it shows up on Timesheet approvals.
-
37
Time your work
Choose a project and press Start timer. When you stop it, the time is added to this timesheet on the day you started it.
-
38
Hours by kind of work
Under the table, choose Northwind web shop: a second list appears with its work types. Pick “Development” and press Add, then add the project once more with “Meetings”. Each is its own row, so you can enter 5 hours of development and 1 hour of meetings on the same day. Meetings are not billable: they count as cost but stay off the invoice. Work types are set under Projects → ⋮ → “Work types”.
-
39
Your bookings in your calendar
Add to my calendar gives a link for Google Calendar or Outlook. The calendar keeps showing your bookings as they change.
-
40
Fix a timesheet that was sent back
The bell at the top holds three messages from Warp Capacity: your week ahead, a changed plan, and last week’s timesheet sent back with a reason. Fix that week and submit it again.
Fix last week’s timesheet →
Timesheet approvals: checking everyone’s hours Open Timesheet approvals →
-
41
Approve or send back
26 timesheets (one per person and week) are waiting. Click a row to see that week’s hours, then press Approve, or Send back with a reason (both are also in the ⋮ menu at the start of the row) — the person sees the reason on their timesheet and can fix it.
-
42
Close timesheets up to a day
The line under the title says up to which day timesheets are closed. Close timesheets moves that day forward, for example to the end of last month: hours up to it can no longer be changed, so pay and invoices stay right. Open them again removes the closing.
Requests: bookings that wait for approval Open Requests →
-
43
Approve a request
Grace Romano asked to book three people. Press Approve, Book someone else or Decline (with a reason). Until then a request is a dashed bar in the planner.
Utilization: billable time against a target Open Utilization →
-
44
Who is billable enough?
Each person’s billable hours as a share of their working time, next to their target. Switch Planned to Actual (timesheets) to see what really happened.
Baselines: what moved since you promised Open Baselines →
-
45
What moved since kick-off?
The baseline “Plan agreed with clients (kick-off)” was saved three weeks ago. Press Compare with now: Contoso slipped by three weeks and Northwind got extra work.
People: role, hours and rates of each person Open People →
-
46
Change a person
Press Edit at the right end of a row (scroll the table sideways) to set their role, hours a week, rates and skills. Fewer hours a week means less working time in the planner.
Roles: rates that change on a date Open Roles →
-
47
Raise a rate from a date
Designers get a raise next month: their row shows the new rate and its date. Edit a role to add a rate change; hours before that date keep the old rate, so money already earned does not move.
Project templates: a typical project, ready to reuse Open Project templates →
-
48
What a template holds
Press Edit on “Website build”: the phases and the roles to book are counted in days from the start of the project (day 0), so the same template fits any start date. “Apply to a project” on the row plans a project with it.
Time off and holidays Open Time off and holidays →
-
49
Add time off
Press New time off and give someone a week off. In the planner that week is hatched on their row and does not count as their working time.
-
50
Add a public holiday
Press New time off and leave Person empty: the day becomes a holiday for everyone (“Everyone (holiday)”), shown as a hatched orange column in the planner.
Your app: Warp Capacity on your own pages Open Your projects →
-
51
Warp Capacity on your own resource
Your projects (in the menu) is the app’s own resource. Press View on a project: its page shows the box “Plan, actuals and budget”, Warp Capacity’s summary of that project, added with one line of code.
Widgets for your own dashboard
The two rows below are the plugin’s dashboard widgets (CapacityOverview and BillableUtilizationOverview). Their numbers come from the planner and the timesheets; each card says its period (next 4 weeks, this month), so they can differ from the pages, which show longer periods.